2023-06-08
If you have a domain on Cloudflare, you can set up email routing for free! The issue with this is that it only works for receiving email, not sending. If you have Gmail, you can enable sending through your custom domain for free as well.
To start, go to the Cloudflare dashboard for your website and click on the "email" tab on the left. Click the blue button that says "Get Started" and follow the steps to add the DNS records. You will have to verify the gmail address that you want to forward emails to. This part should be pretty straightfoward.
After you have completed this step, you should be able to receive emails on your custom domain. Send a test email and check your Gmail inbox to make sure it works.
Now we are going to enable sending email through the custom domain. Open your Gmail inbox and go to the settings page in the top right. Click "See all settings". Under the "Accounts and Import" tab there is a section called "Send mail as:". Here we are going to add another email address. This should open up in a new browser window.
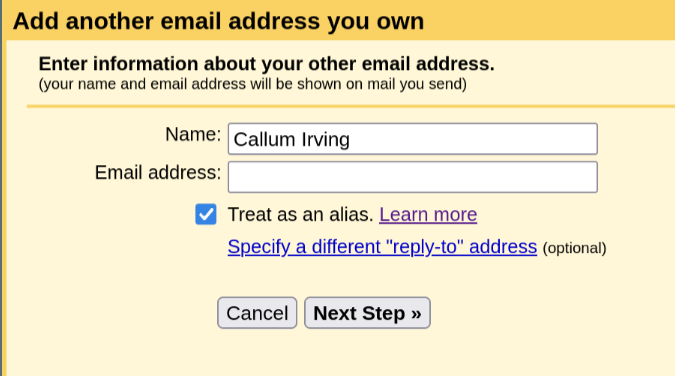
The page should look like this:
Put your custom email address in the "email address" section and leave the box labelled "treat as alias" checked.
On the next page, change the SMTP server to smtp.gmail.com and leave the port number at 587. Your username should be your gmail without the @gmail.com. For example, if your gmail address is someone@gmail.com, you would put someone as the username.
If you don't have 2FA enabled then use the password to your gmail account as the password and skip the next section.
If you have 2FA enabled you will need to generate a password for this. You can do this by going to your account security settings and then clicking on the 2-step verification section. At the bottom of the page there is a section called "app passwords". Generate a new app password for mail and paste it into the password section of the yellow page.
Finally, go back to the "Accounts and Import" section and set your new adddress as the default. You can now send emails from this address!
If you send an email right now it will likely be flagged as dangerous to whoever receives it. To fix this, you need to add an spf record to your DNS configuration.
Go back to the Cloudflare DNS records for your domain and edit the TXT record. Right now it should look something like this:
v=spf1 include:_spf.mx.cloudflare.net ~allAll you need to do is add include:_spf.google.com. Now it should look like this:
v=spf1 include:_spf.mx.cloudflare.net include:_spf.google.com ~allAnd you're done!
Please feel free to email me with any questions or comments about this article.